
A luxury star ceiling isn’t defined by the light source alone, but by the technical precision of the fibre density and the deliberate randomness of the hole pattern. Achieving that perfect, twinkling night sky requires more than just a kit; it requires a disciplined approach to installation that respects the architectural finish of your space. You’ve likely invested significantly in your gypsum boards or custom panels, so the fear of damaging those surfaces or ending up with a cluttered, visible wire mess is a valid concern. It’s also critical to consider how your LED illuminators will handle the specific thermal demands of the Dubai climate.
This star ceiling kit installation guide provides the technical framework you need to master this process with professional confidence. We’ll show you how to execute a clean, high-performance install that ensures long-term reliability and visual impact. You’ll learn the exact methods for mapping fibre patterns, securing Mitsubishi ESKA plastic optical fibre, and managing heat dissipation to protect your investment. We are moving from the initial layout to the final calibration of your light engine to ensure a result that is both technically sound and aesthetically stunning.
Key Takeaways
- Learn to calculate optimal fibre density for luxury Dubai interiors, targeting 50 to 100 points per square metre for a realistic celestial effect.
- Follow this star ceiling kit installation guide to master the use of precision drill bits and high-grade Mitsubishi ESKA plastic optical fibre.
- Understand the process for integrating LED illuminators and twinkle wheels to achieve a natural, shimmering light output without visible wiring.
- Gain technical insights into managing thermal demands and component maintenance to ensure your star ceiling remains bright and functional in the UAE climate.
Planning Your Star Ceiling: Layout and Fibre Density
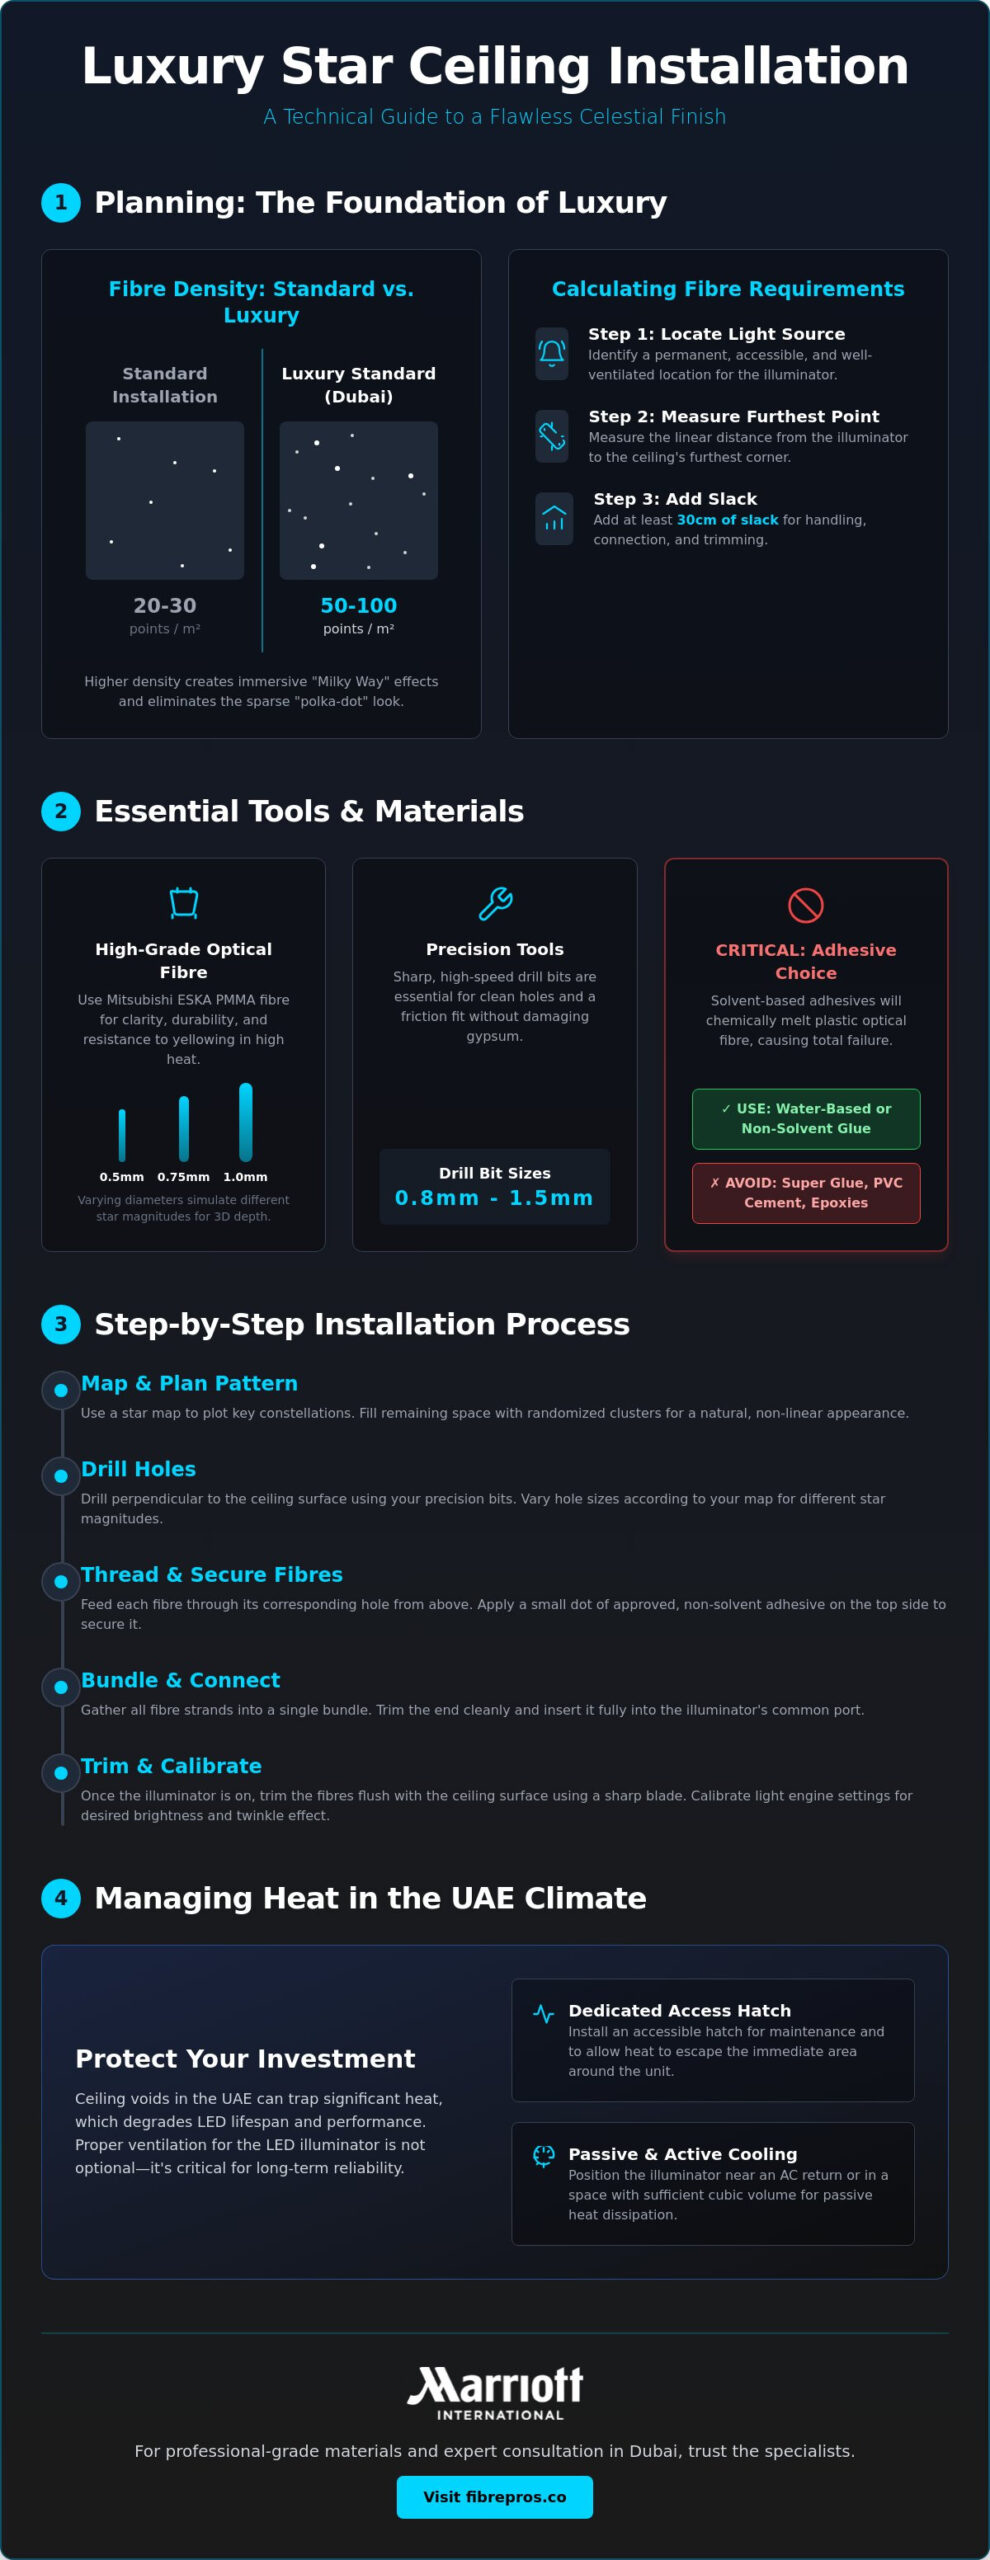
Precision in the planning phase separates a standard lighting project from a high-end architectural feature. While many general guides suggest a density of 20 to 30 stars per square metre, luxury standards in Dubai demand a more immersive environment. For a truly celestial feel, we recommend a density of 50 to 100 points per square metre. This higher concentration allows for the creation of ‘Milky Way’ clusters and identifiable constellations that provide the depth expected in premium residential and commercial spaces. High-density layouts effectively eliminate the sparse, “polka-dot” look common in lower-quality installations.
Your first decision involves the installation method. Pre-made panels offer a modular, controlled environment for fibre threading, making them ideal for retrofitted media rooms. However, a direct-to-gypsum installation provides a seamless, edge-to-edge finish that integrates perfectly with the room’s existing architecture. Using high-quality Mitsubishi ESKA Plastic Optical Fibre ensures that the light remains crisp and the strands don’t become brittle over time. This star ceiling kit installation guide prioritizes a randomized layout to avoid artificial linear patterns. Use a star map to plot specific constellations like Orion or the Big Dipper, then fill the remaining space with varied density clusters to mimic natural galactic structures.
Calculating Fibre Requirements
Accurate measurement is critical to avoid fibre wastage or running short during the threading process. Start by identifying the permanent location of the light source. Measure the linear distance from the illuminator’s port to the furthest corner of the ceiling. You must account for the ‘drop’ through the ceiling material and at least 30cm of ‘slack’ for easy handling during the final trim. Understanding how optical fibers work helps in managing these long runs without significant light attenuation. We utilize varying diameters, typically 0.5mm, 0.75mm, and 1.0mm, to simulate different stellar magnitudes. This variation creates a sense of three-dimensional depth that a single-diameter kit cannot achieve.
Access and Ventilation Planning
The LED illuminator is a high-performance component that requires a dedicated access hatch for long-term maintenance. In the UAE climate, ceiling voids can trap significant heat, which can degrade LED lifespan. You must ensure the illuminator is positioned in a well-ventilated area, ideally near an AC return or in a space with sufficient cubic volume for passive cooling. If you are using a LED illuminator with DMX or Bluetooth capabilities, ensure the electrical point is accessible and within range of your control system. Proper placement of the access hatch ensures that you can reach the twinkle wheel or reset the driver without disrupting the ceiling finish. This proactive planning prevents the need for invasive repairs later.
Essential Tools and Materials for Professional Installation
The success of your project depends entirely on the quality of the components you select. While generic kits often flood the market, a professional star ceiling kit installation guide must emphasize the technical superiority of materials that prevent light leakage and maintain structural integrity. We utilize Mitsubishi ESKA Plastic Optical Fibre because its high-grade PMMA core offers unmatched durability and clarity. This material is designed to resist the yellowing and brittleness that often plague cheaper alternatives in high-temperature environments. Selecting the right fibre is the difference between a system that lasts decades and one that fails within a few years.
Precision drilling requires sharp, high-speed bits ranging from 0.8mm to 1.5mm. Using the correct size ensures a friction fit for the fibre without tearing the gypsum board or damaging the delicate strands. A common pitfall in DIY projects is the use of solvent-based adhesives. These chemicals will chemically melt the plastic optical fibre (POF), causing significant light loss or total failure at the point of contact. You must use water-based or non-solvent glues to secure the strands. For most installations, we recommend end-glow fibres to create distinct points of light, though side-glow fibres are excellent for defining architectural borders or coves. If you’re looking for professional-grade components, you can view our complete range of star ceiling kits specifically curated for the Dubai market.
Fibre Optic Material Specifications
PMMA is the preferred material for residential ceilings because it’s flexible and shatter-proof, making it significantly safer than glass fibre during the threading process. You must respect the minimum bend radius of your fibre to prevent internal cracking and light attenuation. Mitsubishi ESKA fibre maintains an exceptional light transmission efficiency that ensures consistent brightness across even the largest ceiling spans. Modern systems must also align with global building energy efficiency standards, making low-voltage LED illuminators the logical choice for sustainable luxury.
Adhesives and Finishing Tools
For gypsum or acoustic panels, a high-tack, non-solvent PVA glue is the industry standard for securing fibres. When it’s time to trim the excess, sharp side-cutters provide the necessary precision for a flush finish, though some specialists prefer a hot knife to seal the end for maximum light output. For larger “hero” stars that serve as focal points in a constellation, integrating crystal end fittings adds a refined refraction effect that mimics the natural brilliance of a real star. These tools ensure the final surface is clean, professional, and free of visible mechanical defects.
Step-by-Step Installation: From Drilling to Illumination
The physical execution of your project begins with surface preparation. Use a fine chalk line or a laser guide to mark your randomized hole pattern based on the high-density layout established in your planning phase. It’s vital to maintain a natural distribution of 50 to 100 points per square metre to achieve the luxury standard common in high-end Dubai developments. When you’re ready to proceed, this star ceiling kit installation guide emphasizes the use of high-speed drill bits. A steady hand and high RPMs are necessary to prevent the gypsum from tearing, ensuring each aperture is clean and ready for the fibre strands.
Installation is most efficient when performed from the ceiling void or attic space. Thread the fibre bundles through the pre-drilled holes from the top side, allowing each strand to hang at least 10cm below the finished ceiling line. This “slack” provides the necessary leverage for the final trimming process. Once a section is fully threaded, apply a single drop of non-solvent adhesive to the top side of each hole. This secures the fibre permanently without risking the chemical damage associated with standard glues. You must allow the adhesive to cure completely before moving to the final stage to prevent the fibres from shifting or retreating into the ceiling void.
Threading and Bundling Techniques
Organizing your fibres into “tails” or groups of 20 to 30 strands is the best way to prevent tangling during a complex install. This systematic approach is especially useful when navigating the narrow gaps and structural supports found in luxury UAE interiors. You must maintain the integrity of the fibre jacket during the pull. Avoid sharp edges and excessive tension, as even high-quality Mitsubishi ESKA fibres can suffer light loss if the internal core is stressed. Proper bundling ensures a clean path to the LED illuminator port.
Securing and Trimming for the Best Effect
Professional installers often utilize the “paint-over” technique to achieve a flawless finish. By painting the ceiling after the fibres are threaded but before they’re trimmed, you effectively hide the drill holes and ensure the ceiling looks like a solid architectural surface during the day. We recommend waiting at least 24 hours for the adhesive to set before the final cut. You can trim the fibres flush for a subtle look or leave a 2mm to 3mm protrusion. This slight protrusion acts as a tiny lens, creating a wider light spread and a more pronounced “glow” diameter for your stars.
Integrating the LED Illuminator and Control Systems
The final phase of a professional star ceiling kit installation guide focuses on the integration of the light engine, which serves as the “brain” of your celestial display. Once your fibres are secured and cured, you must consolidate the bundle into the common port of the LED illuminator. A precise, perpendicular cut at the bundle head is essential for maximum light transfer. We utilize a dedicated compression fitting to ensure no light escapes from the port into the ceiling void. Any leakage at this junction reduces the lumen output of your “stars” and creates an unprofessional glow around the access hatch.
Environmental management is a critical factor in the Middle East. Ceiling temperatures in Dubai can frequently exceed 50°C during peak summer months, which can lead to driver failure if the unit is not properly cooled. You must select an illuminator with active cooling fans and thermal shut-off protection. If the unit is housed in a restricted space, supplemental ventilation is mandatory to prevent the internal components from degrading. To ensure your system remains operational in these conditions, source your professional LED illuminators and control systems from specialists who understand the regional climate.
Illuminator Placement and Power
Mount the illuminator on a stable, rubber-dampened bracket to eliminate acoustic vibration from the internal twinkle motor. This is especially important in silent home cinemas or master bedrooms where you might want to check out Edge IPTV for premium entertainment. Ensure your electrical points are rated for the UAE standard 230V/50Hz supply. For large-scale Dubai ballroom projects, you can synchronize multiple units using a master-slave configuration via DMX cables. This ensures that the twinkling effect and colour transitions remain perfectly uniform across thousands of fibre points without lag.
Programming Your Night Sky
Realistic celestial effects depend entirely on the speed of your twinkle wheel. Set the motor to a slow, rhythmic rotation to avoid a frantic, artificial appearance. If your kit includes RGBW capabilities, you can program subtle colour washes to mimic deep-space nebulae or the soft glow of the Milky Way. For high-impact installations, secondary “shooting star” units can be integrated into the control system. These units use a separate linear fibre arrangement to create a fast-moving meteor effect that triggers at specific intervals across the ceiling plane.
Maintenance and Troubleshooting Your Star Ceiling
Maintaining a professional lighting installation requires minimal but specific intervention to ensure its longevity. If you notice “dark stars,” you must first determine if the failure is localized or systemic. A single dark point usually indicates a broken fibre strand, often caused by physical impact or excessive tension during the initial setup. Conversely, if an entire section or the whole ceiling loses its shimmer, the issue typically lies with the LED illuminator or the power supply. Utilizing professional star ceiling kits significantly reduces these risks because the components are engineered for industrial-grade uptime and reliability.
Peak brightness is maintained by keeping the fibre ends clean and free of debris. Over several years, microscopic dust can accumulate on the protruding fibre tips, slightly dulling the light output. A gentle wipe with a dry, lint-free microfibre cloth is usually sufficient to restore the original brilliance. As LED technology continues to evolve in 2026, light engines have become more efficient and offer superior colour rendering. This star ceiling kit installation guide recommends choosing a modular system. This allows you to swap out the illuminator for a newer model without disturbing the complex fibre network already embedded in your ceiling. It’s a proactive way to keep your luxury installation compatible with the latest smart home standards, and for those also investing in advanced digital backends, you can check out eCircles LLC for high-performance GPU infrastructure.
Common Installation Mistakes to Avoid
Avoid over-bending the fibres during the threading process. Exceeding the minimum bend radius causes internal fractures in the PMMA core, leading to light attenuation. You must also ensure that only non-solvent glues are used during the securing phase. Solvent-based adhesives will “fog” the fibre tip, permanently reducing light transmission and ruining the starry effect. Finally, ensure your installation hatch provides enough airflow. Inadequate ventilation is the primary cause of premature LED driver failure in restricted ceiling voids, especially in warmer climates.
Long-term Care for UAE Homes
Dust management is a priority for residents in the region. Periodically check the cooling fans on your LED illuminator to ensure they are free of debris. Dust buildup can lead to overheating and reduced component lifespan. If you decide to repaint your ceiling, you can protect the stars by applying a tiny amount of petroleum jelly to the fibre tips or simply re-trimming them by 1mm after the paint has dried. This refreshes the light output and keeps the stars crisp against the new finish. For those seeking the highest standards in celestial lighting, contact Fibrepros for professional kit supply and expert advice in Dubai to ensure your project stands the test of time.
Elevate Your Architectural Vision with Precision Lighting
Mastering a luxury fibre optic install requires a balance of creative vision and technical discipline. By following this star ceiling kit installation guide, you’ve learned how to calculate high-density layouts, select the correct PMMA materials, and manage the specific thermal challenges of the UAE climate. Precision in the drilling phase and care during the final calibration of your LED illuminator ensure a result that remains both vibrant and reliable for years to come. These technical details distinguish a standard lighting project from a high-stakes architectural feature.
As an official Mitsubishi ESKA distributor and specialist GCC lighting experts since 1995, we provide the technical support required for Dubai’s most prestigious properties. Whether you’re an architect managing a commercial build or a DIY enthusiast refining a home cinema, our team offers the specialized mastery needed for operational success. You can now Browse our Professional Star Ceiling Kits for Dubai Delivery to secure the industry-standard components for your next project. Your path to a perfectly executed, shimmering night sky is now clear.
Frequently Asked Questions
Can I install a star ceiling kit on an existing ceiling?
You can install a star ceiling kit on an existing ceiling provided you have access to the ceiling void from above, such as an attic or crawl space. If top-side access is unavailable, the standard professional approach involves installing a secondary drop ceiling or false gypsum panels. This allows for the necessary threading and bundling of fibres without compromising the structural integrity of the main slab or architectural finish.
How many fibres do I need for a standard-sized bedroom in Dubai?
A luxury bedroom in Dubai typically requires a density of 50 to 100 points per square metre to achieve a realistic celestial effect. For a 15-square-metre room, this equates to a requirement of 750 to 1,500 fibres. Following a high-density star ceiling kit installation guide ensures the display looks like a deep, immersive night sky rather than a sparse or artificial pattern.
Is fibre optic lighting safe for nurseries and kids’ rooms?
Fibre optic lighting is exceptionally safe for nurseries and children’s rooms because the fibres themselves carry no electricity or heat. The LED illuminator remains in a separate, ventilated location while the PMMA fibres simply transmit light to the ceiling surface. There is no risk of glass breakage or electrical shock, making it an ideal choice for sensitive residential environments where safety is a priority.
What is the difference between a cheap DIY kit and a professional star ceiling kit?
Professional kits utilize high-grade materials like Mitsubishi ESKA plastic optical fibre, which prevents the brittleness and yellowing common in entry-level products. They also feature robust LED illuminators with active cooling and synchronized control systems. Cheap kits often lack the thermal management needed for the UAE climate and use lower-quality plastic that loses light transmission efficiency within a few months of operation.
Do I need a transformer for the LED illuminator in the UAE?
Most modern LED illuminators are designed to operate on the standard UAE 230V/50Hz power supply without an external transformer. You should always verify that the unit’s internal driver is rated for this specific voltage range during the planning phase. Ensuring a stable electrical connection prevents flickering and protects the sensitive internal electronics from local power fluctuations and potential surges.
How long do the LED bulbs in the star ceiling illuminator last?
High-quality LED illuminators are typically rated for 50,000 hours of continuous operation. This translates to over 15 years of use if the system is active for eight hours every night. To reach this lifespan, you must maintain adequate ventilation in the ceiling void to prevent heat buildup. This star ceiling kit installation guide emphasizes that heat is the primary cause of premature LED degradation in the Middle East.
Can I use star ceiling kits in wet areas like bathrooms or spas?
You can safely use star ceiling kits in bathrooms, steam rooms, and spas because the optical fibres are entirely waterproof and non-conductive. The LED illuminator must be installed in a dry, ventilated area outside the humid zone. This separation ensures that the visual display remains immune to moisture and steam while keeping all electrical components completely protected from the environment.
What happens if a single fibre optic strand breaks during installation?
If a single fibre strand breaks, that specific point will become a “dark star” and stop emitting light. Because professional installations utilize hundreds or thousands of points, a single breakage is rarely noticeable in the overall galactic pattern. If the break occurs during the threading process, you can simply pull a replacement strand from the bundle before the final adhesive is applied to the surface.