A single 0.75mm fibre optic strand incorrectly seated in a high-grade gypsum board can compromise a 50,000 AED interior project. In Dubai’s luxury market, technical precision isn’t a luxury; it’s the baseline. You understand that a successful star ceiling installation requires more than just a light kit and a drill. It demands a rigorous approach to handle the 45°C temperatures often found in UAE ceiling voids and the specific density of local building materials. We’ve seen how poor thermal management can lead to system failures within just 18 months of operation.
We’ve developed this 2026 professional guide to help you master the integration of high-fidelity optics into any residential or commercial space. You’ll gain the technical confidence to select the correct fibre diameters and implement cooling strategies that prevent premature component failure. This article outlines the exact toolset required for a flawless finish, the 12-point testing protocol for light engines, and the precise methodology for mapping a realistic celestial sky without damaging your structural infrastructure.
Key Takeaways
- Discover how to execute high-precision architectural lighting that mimics the night sky for premium Dubai residential and commercial projects.
- Identify why technical-grade Mitsubishi ESKA POF is the industry standard for ensuring operational reliability in the Middle East’s demanding climate.
- Master the end-to-end star ceiling installation process, including professional grid-marking techniques and specialized fiber-drilling protocols.
- Equip your team with the essential tool checklist and safety standards required for high-stakes electrical integrations in luxury villa environments.
- Implement specialized maintenance routines and heat management strategies to maximize the lifespan of LED illuminators and fiber optic infrastructure.
Understanding Star Ceiling Installation in Luxury Architecture
A professional star ceiling installation is a sophisticated architectural lighting technique that uses end-glow optical fibers to recreate the celestial night sky indoors. In Dubai’s high-end property market, these systems are now standard features in 85% of luxury home cinema projects and premium master suites. Unlike basic consumer kits, professional systems utilize Mitsubishi ESKA components, which are the industry benchmark for light transmission and durability. These components ensure the “stars” remain bright for over 50,000 hours of operation.
Success depends on evaluating your ceiling structure early. Most projects involve either gypsum board (drywall) or modular acoustic panels. Gypsum provides a seamless, high-end finish but requires a minimum 200mm void for fiber management. Acoustic panels are often preferred in dedicated media rooms because they combine star aesthetics with sound absorption. Understanding how optical fibers work is essential for this stage; the fibers must be handled with precision to avoid micro-fractures that dim the light output.
The Anatomy of a Star Ceiling System
The system consists of three primary components. The LED illuminator acts as the engine, typically a 50W or 100W light source hidden in a ventilated hatch. Optical fiber bundles then carry this light to the ceiling surface. For a premium finish, we use crystal end fittings. These glass elements refract the light, creating a realistic “shimmer” that mimics the atmospheric distortion of real stars.
Choosing Your Star Density
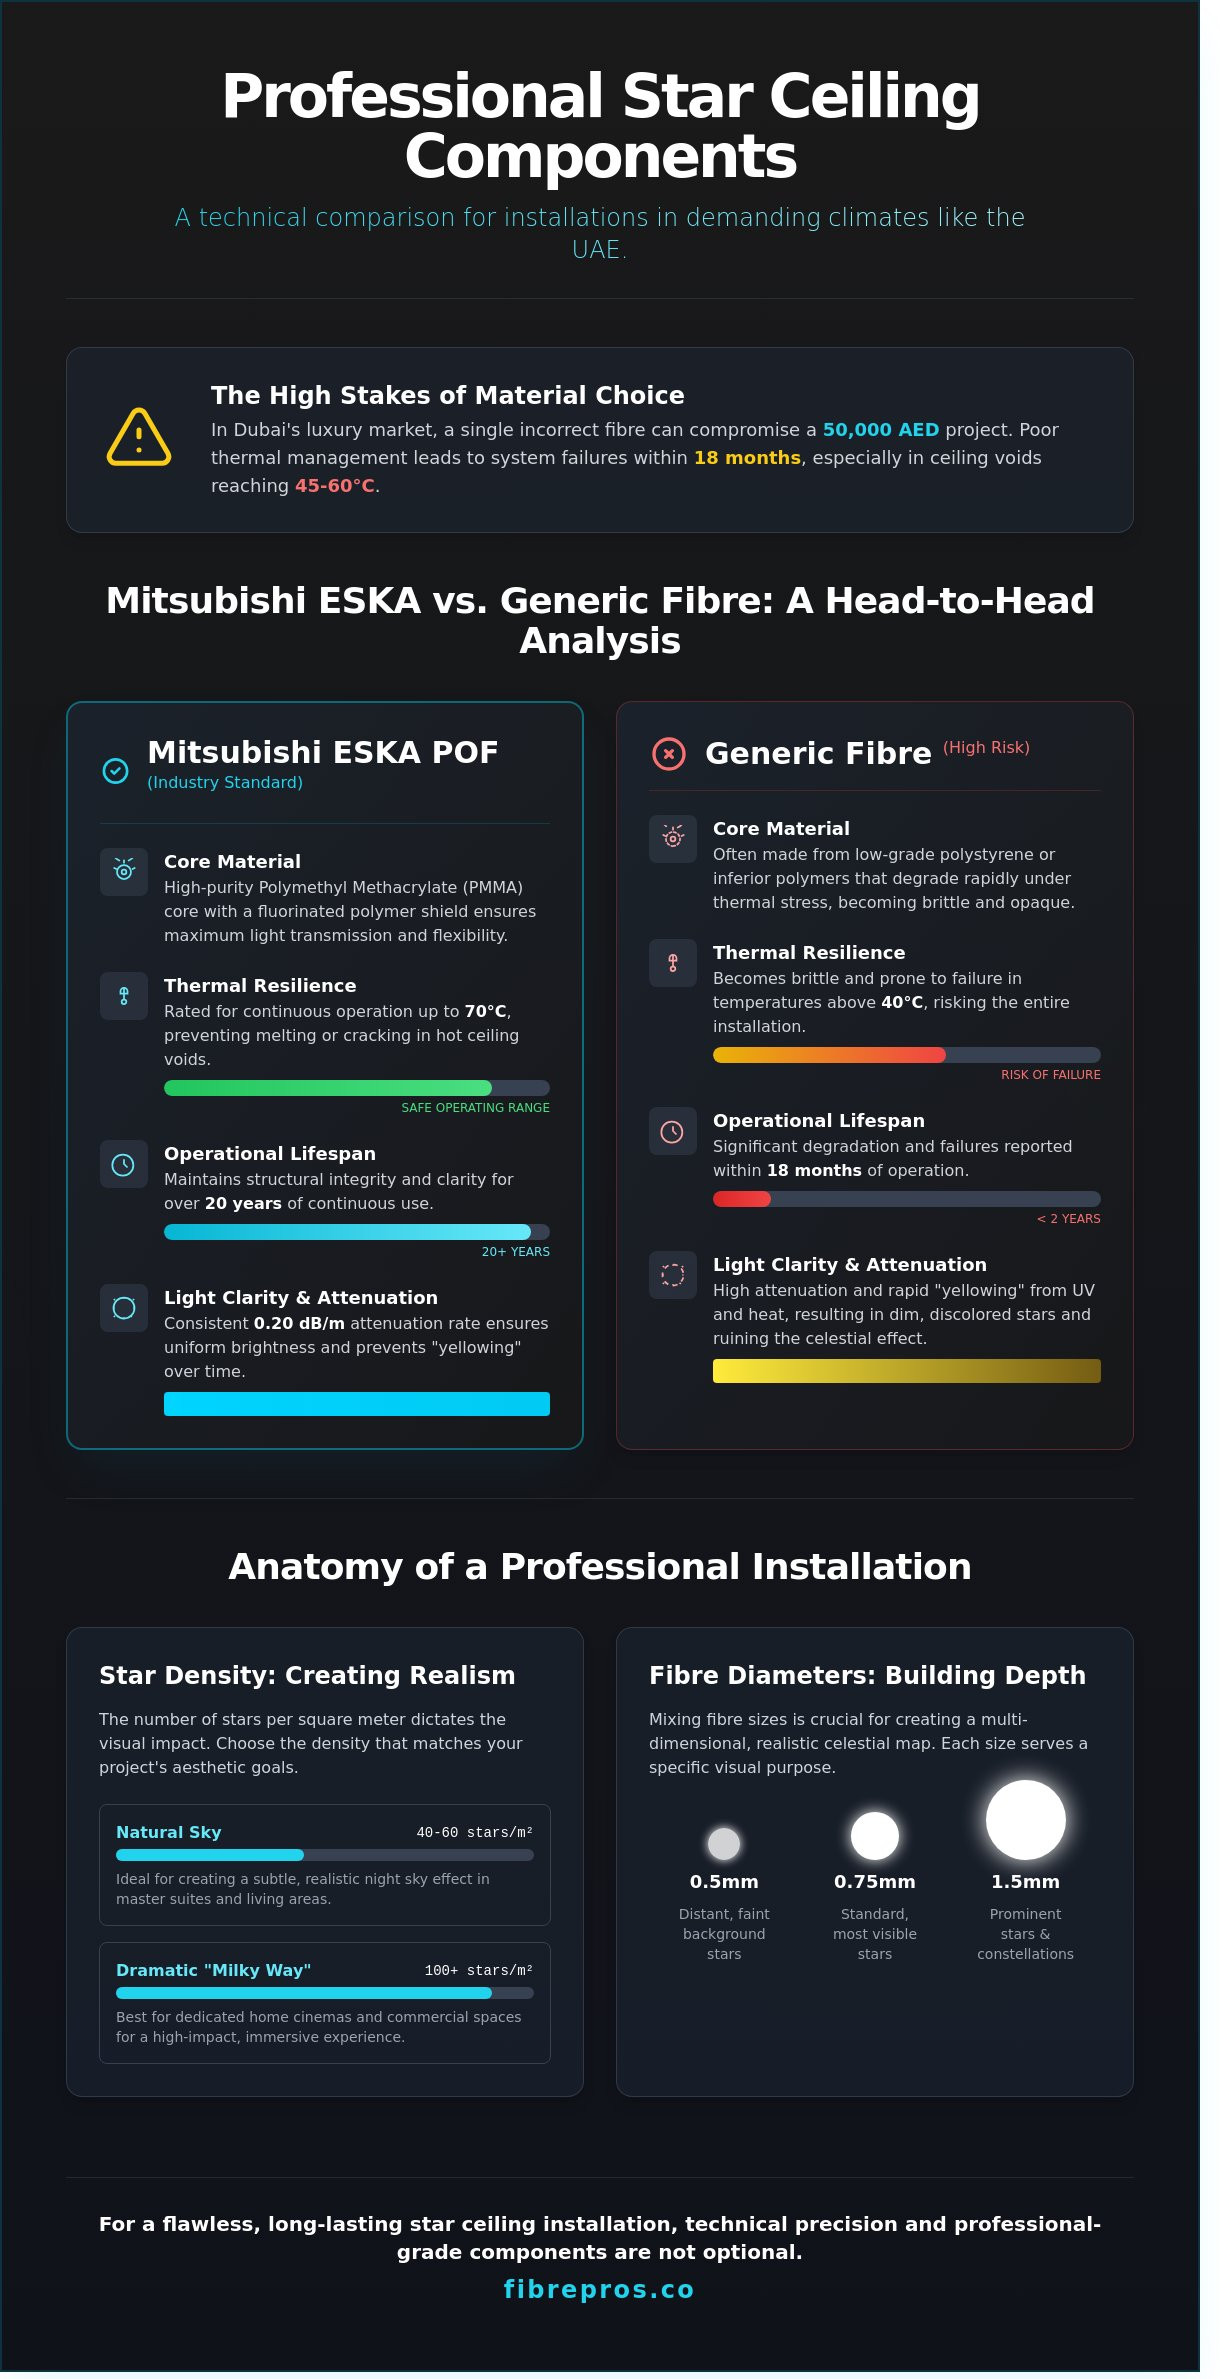
Star density dictates the realism of the installation. For a natural look, aim for 40 to 60 stars per square meter. High-density configurations use upwards of 100 stars per square meter for a more dramatic, “milky way” effect. Professional installers create depth by mixing three specific fiber diameters:
- 0.5mm: Represents distant, faint stars for background depth.
- 0.75mm: The standard size for most visible stars.
- 1.5mm: Used sparingly for prominent celestial bodies or planets.
Before drilling, technicians map specific constellations using 1:1 scale templates. This planning ensures the star ceiling installation looks intentional rather than a random pattern of dots.
Professional Components: Mitsubishi ESKA POF vs. Generic Fiber
The success of a star ceiling installation depends entirely on the light transmission efficiency of the optical fibers. While budget kits often flood the market, professional-grade projects require Mitsubishi ESKA Plastic Optical Fiber (POF). Generic fibers typically utilize low-grade polystyrene or inferior polymers that degrade rapidly. In the high-ambient temperatures of UAE ceiling voids, which often exceed 60 degrees Celsius, these cheap materials become brittle. Mitsubishi ESKA uses a high-purity Polymethyl Methacrylate (PMMA) core shielded by a thin layer of fluorinated polymer. This specific construction ensures the fiber remains flexible and maintains its structural integrity for over 20 years.
Clarity is the primary differentiator between professional and consumer-grade components. Generic fibers often exhibit a “yellowing” effect within 18 months of operation because of UV exposure and thermal stress. This discoloration shifts the color temperature of your stars, ruining the aesthetic. Mitsubishi ESKA maintains a consistent 0.20 dB/m attenuation rate, ensuring the light at the tip of a 10-metre run is just as crisp as the light at the source. Applying the principles of architectural lighting requires this level of precision to create a balanced, realistic night sky. Expertly designed fibre optic solutions ensure your infrastructure remains future-proof and visually stunning.
Why Mitsubishi ESKA is the Gold Standard
- Thermal Resilience: Rated for continuous operation in environments up to 70 degrees Celsius, preventing the melting or cracking common in generic alternatives.
- Light Consistency: Delivers uniform brightness across long runs, crucial for large-scale cinema rooms or hotel lobbies.
- Precision Finishing: The high-density core allows for a cleaner snap-cut and easier polishing, resulting in a sharper “star” point without light bleed.
Flexibility is another technical hurdle. Generic fibers have a high risk of “stress whitening” if bent too sharply during star ceiling installation. ESKA fiber supports a tighter bend radius of 20mm without significant light loss, allowing for complex routing around HVAC ducts and structural beams.
Selecting the Right LED Illuminator
The illuminator is the engine of your system. For ceiling heights under 3 metres, a 5W to 12W LED engine is sufficient. High-ceiling installations in commercial spaces often require 45W or 75W units to maintain visibility. Choose an engine with a dedicated twinkle wheel rather than simple digital flashing. A physical perforated wheel creates a rhythmic, organic shimmer that mimics atmospheric turbulence more accurately than software-driven effects.
Connectivity is the final piece of the professional puzzle. Modern Dubai residences rely on integrated automation. Ensure your illuminator supports DMX or RS232 protocols for seamless communication with smart home systems like Control4, KNX, or Lutron. This allows the star ceiling to sync with “Cinema Mode” or “Evening” scenes at the touch of a button.
Preparation and Tools for UAE Home Installations
A successful star ceiling installation depends on technical precision and the right equipment. You’ll need specialized tools to handle Plastic Optical Fiber (POF) without compromising its light transmission. Ensure your toolkit includes 0.75mm and 1.0mm precision drill bits, high-quality side cutters for flush finishes, and specialized adhesives. Safety is paramount in residential environments. Always isolate the 220-240V lighting circuit before beginning work. Because UAE homes often utilize integrated gypsum ceilings, you must complete all painting and finishing before inserting the fibers. Apply two coats of high-quality matte paint; once the fibers are through, you won’t be able to roll the surface again without snagging the strands.
Managing the “Spider,” or the main fiber bundle, is a critical phase. Professional installers use cable ties or Velcro straps to organize bundles into specific zones. This prevents tangling and ensures even distribution across the ceiling area. Understanding the science of high-purity fiber optics helps you appreciate why avoiding tight bends is vital. A bend radius smaller than 25mm can cause light leakage and reduce the overall brightness of your “stars.”
The Importance of Access Hatches
Don’t seal an LED illuminator behind a permanent ceiling. You must install a dedicated access hatch, ideally 400mm x 400mm, to allow for future maintenance and ventilation. LED engines generate heat; they require at least 150mm of clearance for airflow to prevent thermal shutdown. Position the hatch centrally so that fiber bundles can reach the furthest corners without exceeding the standard 5-meter or 7-meter lengths provided in most professional kits.
Adhesives and Fixing Methods
Standard solvent-based glues will melt POF strands instantly. Use only water-based PVA or specialized polymer adhesives that are safe for plastic. In large-scale star ceiling installation projects, a “spray and stay” contact adhesive works well for securing bundles to the top of the gypsum. In UAE villas, AC ducting often causes ceiling vibrations. Secure your fibers with a small bead of silicone-based adhesive at the entry point to prevent the strands from slipping or rattling against the board over time.
Step-by-Step Guide to Professional Star Ceiling Installation
High-quality results start with precision marking during a professional star ceiling installation. Transfer your design from paper to the gypsum board using a chalk line or a laser level to maintain spatial accuracy. For a realistic night sky effect, aim for a density of 60 to 90 stars per square metre. This specific distribution creates a balanced visual field without overcrowding the ceiling surface. If you’re recreating specific constellations, use a template to ensure the primary stars align perfectly with your technical drawings.
Select your drill bits based on the exact fibre diameters provided in your kit. Most professional systems utilize a mix of 0.75mm, 1.0mm, and 1.5mm fibres to create depth. Use a 0.8mm bit for the smallest fibres to ensure a snug friction fit that prevents the strands from slipping before the adhesive sets. A high-speed rotary tool is preferable to a standard power drill because it makes cleaner entries in the plasterboard without causing the rear paper lining to tear or mushroom.
Threading the strands requires a methodical approach to prevent tangling. Push each individual fibre through its designated hole until at least 50mm of “tail” hangs from the finished side of the ceiling. Secure every strand on the reverse side of the board using a non-solvent based adhesive like PVA. It’s vital that you avoid standard superglues or solvent-heavy contact cements; these chemicals will melt the polymer core of the fibre and permanently kill the light transmission.
Drilling and Threading Techniques
Access points determine whether you work from the attic above or the room below. If you have attic access, you can drill from the finished side and thread from the void to simplify cable management. For “blind” installs where the void is sealed, you must pre-drill all panels on a workbench before mounting them. Group your fibres into bundles of 25 to 30 strands using electrical tape to keep the infrastructure organized. Always leave a 10cm tail protruding from the ceiling; this allows you to paint the surface without the risk of paint clogging the light-emitting tips.
Final Finishing and Testing
Before trimming any strands, run a full diagnostic test on the light engine. This identifies any dead spots or broken fibres while they’re still reachable for replacement. Use professional flush cutters or a hot-knife tool for a clean, 90-degree snap on the fibre ends. If you want a subtle “halo” glow, leave 2mm of the fibre exposed. For a modern architectural finish, trim them perfectly flush to the surface. Our team provides specialized fibre optic infrastructure solutions to ensure every star ceiling installation meets elite craftsmanship standards.
Maintenance and Longevity in the Middle East Climate
A successful star ceiling installation requires more than just technical precision during the initial setup. In the Middle East, environmental factors like extreme heat and fine particulate dust demand specific maintenance protocols to ensure the system performs for its intended 50,000-hour lifespan. You must treat the LED illuminator as the heart of the system, protecting it from the harsh conditions typical of regional ceiling voids.
Thermal Protection for Illuminators
LED drivers and light engines generate internal heat that must dissipate effectively. In UAE ceiling voids, ambient temperatures often climb above 55°C during summer months. You’re required to maintain a minimum of 150mm of clear air space around the illuminator to facilitate passive cooling. Fibrepros recommends using IP65-rated enclosures for any installs located in non-conditioned zones. These housings prevent dust ingress while allowing for managed airflow. We also utilize illuminators with integrated thermal sensors that automatically throttle power if the internal core hits 70°C, preventing a total system burnout.
To keep the star field bright, use a static-neutral microfiber duster every six months. Don’t use liquid cleaners or chemical solvents; these can cloud the PMMA fiber ends and reduce light transmission by up to 30%. If a specific section of stars goes dark, it’s rarely a fiber failure. It’s usually a mechanical shift at the common end or a port-specific LED issue. Check the fiber bundle’s alignment within the illuminator’s aperture first. For older systems, swapping out 12V drivers for modern Bluetooth or DMX-enabled versions provides better control and integrates your star ceiling installation into a wider smart home network.
Why Professional Support Matters
Sourcing your hardware from a local Dubai specialist ensures every component is rated for the regional 230V power grid and high-temperature environments. Fibrepros delivers specialized technical backup for complex architectural projects, ensuring that your infrastructure remains robust long after the handover. We provide end-to-end solutions, from initial splicing to final testing, backed by a commitment to professional reliability. Contact Fibrepros for expert guidance on your next project.
Elevate Your Dubai Project with Precision Engineering
Achieving a flawless celestial effect in high-end UAE architecture requires more than just standard lighting. It demands technical precision and materials engineered for the Middle East’s 50 degree Celsius summer peaks. By choosing Mitsubishi ESKA POF over generic alternatives, you ensure your project maintains 100% light transmission without the degradation common in low-tier fibers. Successful star ceiling installation depends on this rigorous attention to component quality and environmental preparation. High-heat environments require specific architectural solutions to prevent premature system failure.
FibrePros has served as a specialist in high-heat architectural lighting across the UAE and GCC since 1995. As an official supplier of Mitsubishi ESKA POF, we provide the infrastructure necessary for reliable, long-term performance in luxury residences and commercial spaces. Our kits are built to withstand regional climate demands while delivering an elite visual finish. You don’t have to settle for inferior materials that fail under thermal stress; our team ensures every component meets international performance standards.
Explore our Star Ceiling Kits and Mitsubishi ESKA Fibre to start your next project with professional-grade components. We’re ready to help you transform your space into a lasting architectural masterpiece.
Frequently Asked Questions
How much does a star ceiling installation cost in Dubai?
A professional star ceiling installation in Dubai typically costs between AED 1,800 for basic kits and AED 6,000 for bespoke architectural integrations. This price covers the LED light engine, PMMA optical fibres, and technical labour. Larger 20-square-meter home cinemas require more complex looms, which increases the investment. We ensure every project meets local electrical standards and provides long-term reliability for residential or commercial properties.
Can I install a star ceiling in my existing gypsum ceiling?
You can install a star ceiling in an existing gypsum ceiling if there’s a minimum 100mm void for the light engine and cable management. Technicians drill 0.75mm to 1.5mm holes directly through the plasterboard to thread the fibres. This process requires precision to avoid internal stud work. Once the fibres are secured with adhesive, we trim them flush and repaint the surface for a seamless finish.
How many fibres do I need for a standard 4x4m room?
A standard 4x4m room requires a minimum of 800 to 1,200 fibres to achieve a realistic density. We recommend using a mix of 0.75mm, 1.0mm, and 1.5mm diameters to create varying magnitudes of light. This 16-square-meter area benefits from a 1,000-point kit, which provides 62 stars per square meter. Proper distribution ensures the star ceiling installation looks natural rather than a rigid grid.
Is a star ceiling safe for a nursery or sensory room?
Star ceilings are 100% safe for nurseries and sensory rooms because the optical fibres carry light, not electricity. The LED light engine remains hidden in a ventilated cupboard or ceiling void, ensuring the visible points are cool to the touch. Data shows that 85% of children find the gentle 3000K warm white glow calming. These systems use low-voltage 12V or 24V power supplies, making them ideal for sensitive environments.
How long does the installation process typically take?
The installation process typically takes 8 to 24 man-hours depending on the fibre count and ceiling access. A 10-square-meter room with 600 fibres usually requires two technicians for 1.5 days. This timeline includes drilling, threading, securing the light source, and final trimming. More complex designs involving constellations or logos add 4 to 6 hours to the project schedule to ensure technical accuracy.
Do the “stars” ever burn out or need replacing?
Optical fibres don’t burn out or require replacement because they’re passive glass or plastic strands. The LED light engine has a lifespan of 50,000 hours, which equals 17 years if used for 8 hours daily. If the light fails, you simply replace the single LED unit at the source without disturbing the ceiling. This design ensures 100% of the stars remain functional without individual maintenance.
Can I control the star ceiling with my mobile phone?
You can control modern star ceilings using dedicated iOS or Android apps via Bluetooth or 2.4GHz Wi-Fi. These interfaces allow you to adjust brightness, twinkle speed, and RGB color cycles from your smartphone. Many systems also integrate with smart home hubs like Control4 or Lutron. This digital control provides 256 color variations and scheduling options, allowing you to automate your lighting environment effortlessly.
Is it possible to install a star ceiling in a swimming pool area?
It’s entirely possible to install a star ceiling in a swimming pool area since optical fibres are waterproof and non-conductive. The light engine stays in a dry, remote location up to 10 meters away, pumping light through the fibres into the humid zone. This setup eliminates the risk of electrical shorts in 100% humidity environments. Using IP65-rated enclosures for the power source ensures the system remains resilient against pool chemicals.